A Tide-Pool Sketchbook for a Quiet Afternoon
A tide-pool sketchbook turns a quiet shore visit into careful drawing: notice changing water, trace rock shapes and record wildlife without disturbing it.
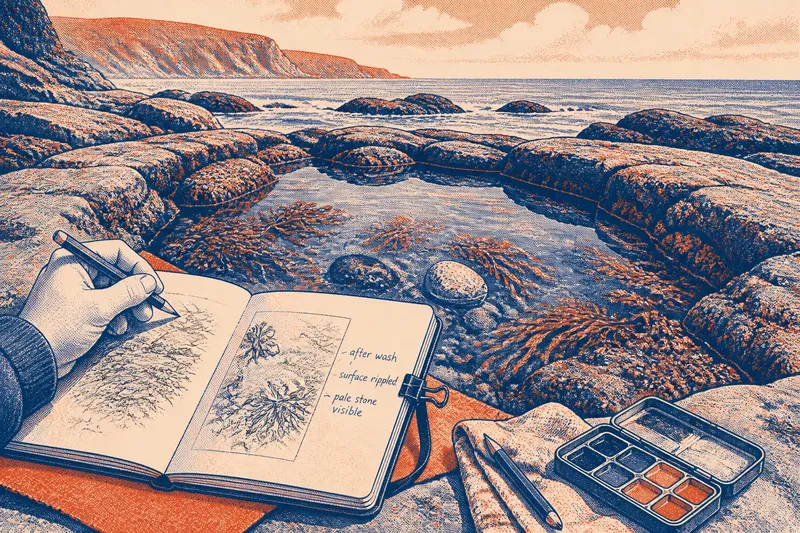
The common mistake with a tide-pool sketchbook is leaning in for a closer look until a boot scuffs the rim or a shadow falls across the water; the cost is a disturbed pool and a missed chance to notice its finer details. A tide-pool sketchbook works best from a steady, dry spot, where you can draw what the water reveals without touching it or moving anything.
Keep the afternoon simple: choose a suitable place, settle with a few light materials, then make a sequence of quick observations as the view shifts. The aim is not a polished natural-history plate. It is a record of shapes, textures and small changes that would otherwise pass unnoticed.
Where can you sit and sketch safely?
Begin by looking at the shore before opening your book. Find a broad, stable patch of bare rock or firm ground above the pool’s edge, well clear of waves and slippery weed. Avoid narrow ledges, loose boulders and places where your only way to see is to step between pools. If the tide is rising, keep a clear route back towards the beach.
Choose a view that gives you room to sit or stand without blocking a path or disturbing anyone else. A pool is often easier to read from slightly above and to one side than from directly over it. That angle can reveal the rim, submerged stones and patches of reflected sky at once.
Check local signs and access guidance, and follow any restrictions on entry or protected areas. If conditions change, the rock becomes slick, or waves begin reaching your chosen spot, pack up and move away. The sketch can wait; the shoreline will offer another view.
What should you pack for a tide-pool sketchbook?
Use a small sketchbook with paper that can take a little damp air, a graphite pencil and a soft eraser. A dark pencil or fine waterproof pen can help make a few clear contours, but a single pencil is enough to begin. A clip or elastic band keeps loose pages from flapping in the breeze.
Bring a kneeling pad or sit mat if the ground is dry and suitable, plus a cloth to keep your hands and book clean. A compact watercolour set is optional; if you use one, paint on the page rather than rinsing brushes in a pool or stream. Leave magnifiers, nets, jars and collecting containers at home: they encourage handling and add little to a drawing session centred on observation.
It is not worth carrying a full artist’s kit or trying to label every organism. A few lines and a useful note about the light or water level can preserve the character of the scene better than a crowded page.
How do you begin drawing the pool?
Give your eyes a moment to adjust to the whole scene. Notice the pool’s outline first: is it a shallow bowl, a long groove, or a cluster of connected hollows? Sketch that outer shape lightly, then add the large forms inside it, such as a dark cleft, a pale stone or a frill of seaweed. Leave gaps where glare hides the bottom rather than filling them with guesses.
Next, choose one small area to study. You might draw the scalloped edge of a rock, the overlapping ribbons of algae or the broken reflection of a cloud. Use short marks for rough stone and longer, curved strokes for strands lying beneath the water. A few changes in line direction can suggest texture without attempting to render every detail.
Keep wildlife at a respectful distance. Draw only what you can see from where you are, and let a retreating animal, a closed shell or a creature hidden under weed remain undisturbed. If a detail is unclear, mark its position and return to the surrounding shape instead of reaching closer.
How can you record a changing view?
Make a second small sketch after a pause, using the same viewpoint. The pool may look different as a wave passes, glare shifts or water drains from a shallow shelf. Add a simple arrow for the light, a note such as “surface rippled” or “stone newly exposed”, and the order of your sketches. These clues explain the drawing without turning the page into a field report.
Say you settle above a narrow, crescent-shaped pool and first draw its rim with a dark channel in the centre. A passing wash briefly smooths the surface, making a pale stone visible; you add it to a second sketch and note “after wash”. The expected observable result is a pair of pages that records both the fixed rock shape and the fleeting change in visibility, without anything being moved.
For a more deliberate comparison, keep the outline in the same place on the page and vary only the marks for water and reflection. That makes changes easier to see later. There is no need to write a tide table or calculate anything: the purpose is to capture what your eyes can follow in the moment.
What should you do if the pool is crowded, dim or hard to read?
What if people are already exploring nearby?
Choose another pool or draw the broader shoreline from a public, unobtrusive spot. Give visitors space, and avoid placing your sketchbook or bag where people need to step.
How do you draw glare on the water?
Leave bright patches of paper blank and sketch the darker shapes around them. A short note about the glare can distinguish a reflection from an empty patch in the pool.
What if the pool is too dim to see into?
Draw its rim, the visible stones and the contrast between wet and dry rock. Treat the hidden centre as an honest blank rather than inventing detail.
Can you sketch wildlife without naming it?
Yes. Record its outline, position and visible movement in plain language, such as “small striped shape beneath the ledge”. A careful description is more useful than a confident but uncertain name.
How should you close the sketchbook session?
Before leaving, take a final look from your safe spot and add one line about what has changed: the water’s surface, the direction of the light or the edge newly exposed. Check that you have left no scraps or equipment behind, then walk out by the route you came in. Do not pick up shells, seaweed or stones as souvenirs; the scene is already on the page.
At home, add a small title or location note while the visit is fresh, without trying to turn the drawing into a perfect record. A tide-pool sketchbook is most satisfying when it keeps the sequence intact: where you stood, what the water showed, and what changed while you watched. On your next visit, that modest record can help you notice a different shape or light, even from the same quiet patch of shore.